Showing posts with label DIY. Show all posts

Monday, March 17, 2014

Irish Stew & Shamrock Canvas Painting

Hello, friends! I haven't posted through the weekend due to hardly being home. Friday and Saturday were spent out at a friends house. I did manage a small craft with my kids and her daughter. It was very easy, very messy, and very fun!


Things you need:
canvas
shamrock cutouts
tape
paint
paintbrushes (but we used a lot of hands mostly)


Tape your cutouts to the canvas. I doubled my tape over and just put it on the back, so that there weren't outline of the tape. Paint all over using hands, brushes, a dog, whatever is nearby. Okay, don't use the dog. Peel off the cutouts. Admire your masterpiece.


Being that it is now St. Patrick's Day, we've accomplished the sharing of our delicious mint chocolate fudge, eating green pies, making leprechaun hats, creating a free printable, enjoying soda bread, and making the canvas. Today the kids donned the green and had some fun party hats. We made a delicious stew with roasted cabbage for dinner.

Stew Ingredients:
1.5lbs of cubed lamb or stew meat
4 cups beef broth
1/4 cup of flour
about 3 Tbsp EVOO
3 garlic cloves, minced
1 medium onion, sliced
2 medium potatoes, cubed
2 large carrots, cut in 1" pieces
1 tsp thyme 
1/2 tsp pepper
salt, if desired (but honestly, the broth is salty enough for us)

Roasted Cabbage Ingredients:
1 large head green cabbage, cut into wedges
EVOO
sea salt


From start to finish, it took approximately 2 hours. Place the flour and meat in a large ziplock bag and toss until covered evenly. I browned the meat in 3 separate batches, using 1 Tbsp of EVOO each time. I used one pot for the entire stew process, but you're welcome to use multiple cooking items. Put 1Tbsp of oil into your pot and heat on medium. Add in the first batch of meat and brown on all sides. Place meat onto a plate lined with a paper towel, or regular towel, whatever tickles your fancy, to soak up the excess grease. Repeat process for the other 2 batches. Using the oil left in the pot, saute the onions until tender. Add in the garlic and saute for another minute or so. Pour the beef broth in and return meat to the pot. Bring to a boil. Reduce heat, cover, and simmer for 1 hr. The last 15ish minutes of this, I chopped my carrots and potatoes. Once the hour is up, add to the stew. Cover and cook for an additional 30 minutes. Towards the end of this, I prepared my cabbage. Preheat the oven to 450F. Line a baking sheet with foil. Spritz the cabbage thoroughly with EVOO and sprinkle on sea salt. Once the timer goes off, add the thyme, pepper, and salt to the stew. Cover and cook an additional 20 minutes. During this time, put the cabbage into the oven. 10 minutes and then flip and cook for an additional 10 minutes. Everything should be done around the same time this way. Seems complicated, but it's really not. 


I apologize for the less than good looking shot of the food, but hungry babies means fast plating. We had a super great week long celebration for St. Patrick's Day and loved sharing it with you all. Stay tuned tomorrow for a great outdoor craft that we also accomplished over the weekend!


Tuesday, March 11, 2014

Leprechaun Hats

So, I am a day behind in my week long St. Patrick's Day celebration posts. My little thing for yesterday flopped. Tomorrow I will get the ingredients needed and make 2 posts to catch up.

This evening we did a little craft. We made leprechaun hats! Super easy to make, adorable as decorations.


Things Needed:
mini clay pots
green paint
black ribbon
paint brush
gold glitter glue pen
tacky glue

Paint the pots green. Allow to dry. Cut a piece of ribbon to fit the pot, just above the rim. Wrap ribbon and glue one end to the other. I overlapped mine just a bit to do this. Draw the buckle with the glitter glue pen. Allow that to dry and tada! Leprechaun hats!


Saturday, December 7, 2013

Teacher Christmas gifts

Hi there! This is the first year I have had the task of creating gifts for a teacher. We decided to make them for all of the staff. Both things were very easy to make.

Bath Bombs
1/2 cup baking soda
1/4 cup citric acid
1 Tbsp oil (I used EVOO because it's what I had)
Essential oils for scent
Silicone ice cube tray
Air tight storage container

In a bowl, mix together the baking soda and citric acid to be sure there are no clumps. Add in the oil and EOs. The amount of EO depends on how strong you want the scent to be. Mix. I found it easiest to press the powder onto the oils in the bottom and then break up, press again, etc.

I found little silicone ice cube trays in the shape of trees, snowmen and Santa, so I used those. Full then and press the mix down. Add another layer, press again. Repeat until mold is full. Let sit for a minimum of 1 hour. I left mine for 6 hours and they were much easier to remove. Place in air tight container for storage.


We Whisk You A Merry "Kiss"mas
Whisk
Hershey's kisses
Ribbon
Plastic treat bags (optional)

Fill the whisk with the kisses. That easy!

I will update with pictures later this evening.

Sunday, October 20, 2013

Memory Shadow Boxes

Hey everyone! We've not been posting much the past week because we've been working nonstop on a HUGE project. I can't wait to share it with all of you! We are just waiting on some last minute things to come in the mail to finishing making the items.

I figured I would share an old DIY project to make up for it. These memory shadow boxes went up on my "Best of Times" wall that I made for my boys. Super simple to make and a lovely way to memorialize the moment that you became a parent!

You will need:
Shadow box
Scrapbook paper
Momentos from the hospital/birth
Tape
Scissors


The easiest way to get the paper the size you need is to the the back of the frame and trace it onto the paper. From there you can trim it down to size and tape to the frame back. I used a roll on tape that can be found in the craft sections. If you put the hospital bracelet like I did, you will need to secure it with glue (or tape if you may want to take it out later on). Place the items into the box how you would like them to be and put the back on. Now hang those adorable boxes up to show off to future guests! Here is our completed wall. I made some subway art with their birth stats and clocks set on their birth times.


We have gotten so many compliments on this wall when people visit. I find myself looking at the wall once in a while reflecting on those moments when my life completely changed. 


Friday, October 4, 2013

DIY: Autumn Door Wreath

My favorite season is autumn. It could be autumn all year long and I would be completely okay with that. The leaves are turning, the weather is cooling down. Sweaters and boots come out of the closet. Fleece pullovers and bonfires. And then there is the decorating. That's the best part! Okay, maybe dressing up for Halloween and cooking Thanksgiving dinner ranks higher, but you know what I mean.


Supplies:
14" Foam wreath form
1 roll of brown ribbon
1 roll of orange ribbon
leaves and berries from a fall garland
tacky glue

Use tacky glue to secure a small section of ribbon. Begin wrapping ribbon around diagonally, like a candy cane, leaving just enough space for the second color ribbon. When you get to the end, cut and secure with more tacky glue. Repeat with second ribbon color. With the remaining ribbon, wrap around bottom (or top) or wreath and secure by tying a bow. Glue your accents on. Be sure to leave the wreath laying flat for at least an hour so that everything dries in place, or else you'll get some sliding around. You can use a hot glue gun for faster drying time, but I seem to have some bad luck burning myself and try to avoid them. Haha. I also found this cute little harvest pilgrim decoration that a friend gave to me years ago that I tied to it.

You can pretty much add whatever little tidbits you'd like to make it yours. Try adding a wooden letter to represent your last name. Some pinecones would also look cute! The possibilities are endless.


Sunday, August 25, 2013

Crayon Art, Who Style!

All of you who know me in real life know I'm a MASSIVE Doctor Who fan. I have a Who area in my spare room, and I needed some more art in there. I have seen the crayon art all over the internet, but I am cheap and didn't want to waste a few boxes of Crayola crayons. Until I found 8 pack boxes specific to a certain color. And I found blues. Blues = TARDIS. TARDIS = Doctor Who. My head went to work and I decided to make a Who themed crayon art piece. The result is this:

I AM IN LOVE!!! I bought that tiny TARDIS at Barnes&Noble and it has just been sitting on a shelf. Now I have a beautiful piece of crayon art, complete with tiny TARDIS that lights up!


Monday, July 8, 2013

solving our bib problem

Thanks to Pinterest, I found a way to solve our bib problem. Usually they are kept in his top drawer, along with socks and hats. The problem is that I have a little piggy who gets super impatient when he knows it's time to eat. The minute that it takes me to walk across the house to his nursery and back to the kitchen is like 1000 baby years. Trust me, none of you want to hear his pitiful whining signaling that mommy is taking too long. 

To solve our problem, I bought a trusty command hook. Lucas has 2 cabinets completely dedicated to him. First is the extra formula and snacks cabinet and then there is the baby food cabinet. We chose that one. Made the most sense. Stick the command hook on the inside of the cabinet door, and TADAAAAA! Bib and food storage in one place. No more mommy taking too long to get everything together. :)


Saturday, February 16, 2013

calm down bottle

As many of my friends know, my oldest son has been having a lot of anger outbursts lately. I was literally at my wits end and then I remembered something I had pinned on Pinterest. The calm down jar. The idea is pretty simple - Shake bottle to release frustration and then sit and watch the glitter fall to the bottom. Once the glitter is settled, continue playing. So it's technically a time out, but he will never know.*


Things you will need:
a clear bottle (I used a generic tall water bottle I found at WalMart)
glitter glue
ultra fine glitter in same color as glue
clear tacky glue
water
baby oil
large bowl
funnel

1. Start by removing the label.
2. Pour a small amount of baby oil on the sticky part where the label came off. A small amount goes a long way.
3. Wash excess oil off of bottle.
4. Fill bottle 3/4 full of water and then dump water into the bowl.
5. Heat water in microwave until VERY hot. This helps the glue break up in the water, rather than remain a glob.
6. Pour the glitter glue and ultra fine glitter into the water.
7. Whisk until all globs are gone.
8. Using the funnel, pour mixture into bottle.
9. Add tacky glue and extra water a little at a time until you achieve the amount wanted to settle. This part takes some time since you will be shaking, waiting and timing.
10. During the next meltdown, have your kiddo shake and watch. 

*Also works on adults. It was very calming to watch the glitter fall.


original post here: My Crazy Blessed Life

Sunday, January 13, 2013

the best of times

I saw something on Pinterest where a family put a huge portrait of their children, a clock below stopped on the birth time and the words "The best of times" above. I wanted to do something similar in my living room, but not exactly the same. I tossed around the idea since July. It is now January and I have finally completed my wall! I kept the best of times and the clocks, but added in some subway art that I made with their statistics, a small picture of them in the hours after birth and a shadowbox with my hospital bracelet, the 'it's a boy' cigar (we had them for both boys) and a handmade item. For Conner it was a pair of booties, for Lucas a pair of mittens. I am absolutely in love with it.


My children are hands down the BEST thing that has ever happened to me. Every time I glance over I am reminded of the best moments in my life - the moment I got to finally hold my precious boys.


Saturday, August 18, 2012

homemade play dough

I'm cheap. I hate buying things at the store like play dough, which will probably get played with twice and then dry out. I can thank the Pinterest Gods again for showing me many homemade play dough recipes. This is the one that worked best for us. I found the tutorial (with step by step pictures) over here. It was easy, I had all the ingredients in my pantry already and it has kept my toddler and the little girl I am babysitting busy for a while. I guess I can also add my BIG child (aka my husband) in on that list. He's currently building play dough cars as I type this!

Ingredients:
1 cup of flour
1 cup of water
1/4 cup of salt
1 tablespoon of vegetable oil
2 teaspoons of cream of tartar
food coloring

Throw all of the ingredients into a medium sized sauce pan. Doesn't matter what order, but I put the food coloring in last. I suggest a wooden spoon. It's easier to work with. Mix everything until almost all the clumps are out. Heat it up over medium heat while continually stirring. It will eventually clump up into a ball of dough (as you are stirring!). This took maybe 4-5 minutes. Take your dough blob and sit it on the counter. It's a little hot, so carefully knead it with your hands to make that play dough consistency. Now it's time to break out the rolling pin and cookie cutters and let the kids go at it!

Finished blob 

And here is my little man cutting sharks out of his portion of the dough

This is probably better than the play dough I've bought from the store. Once you are finished playing, store in an airtight container and it's good for about 6 months (says the original link)!


Sunday, August 12, 2012

deployment craft #2

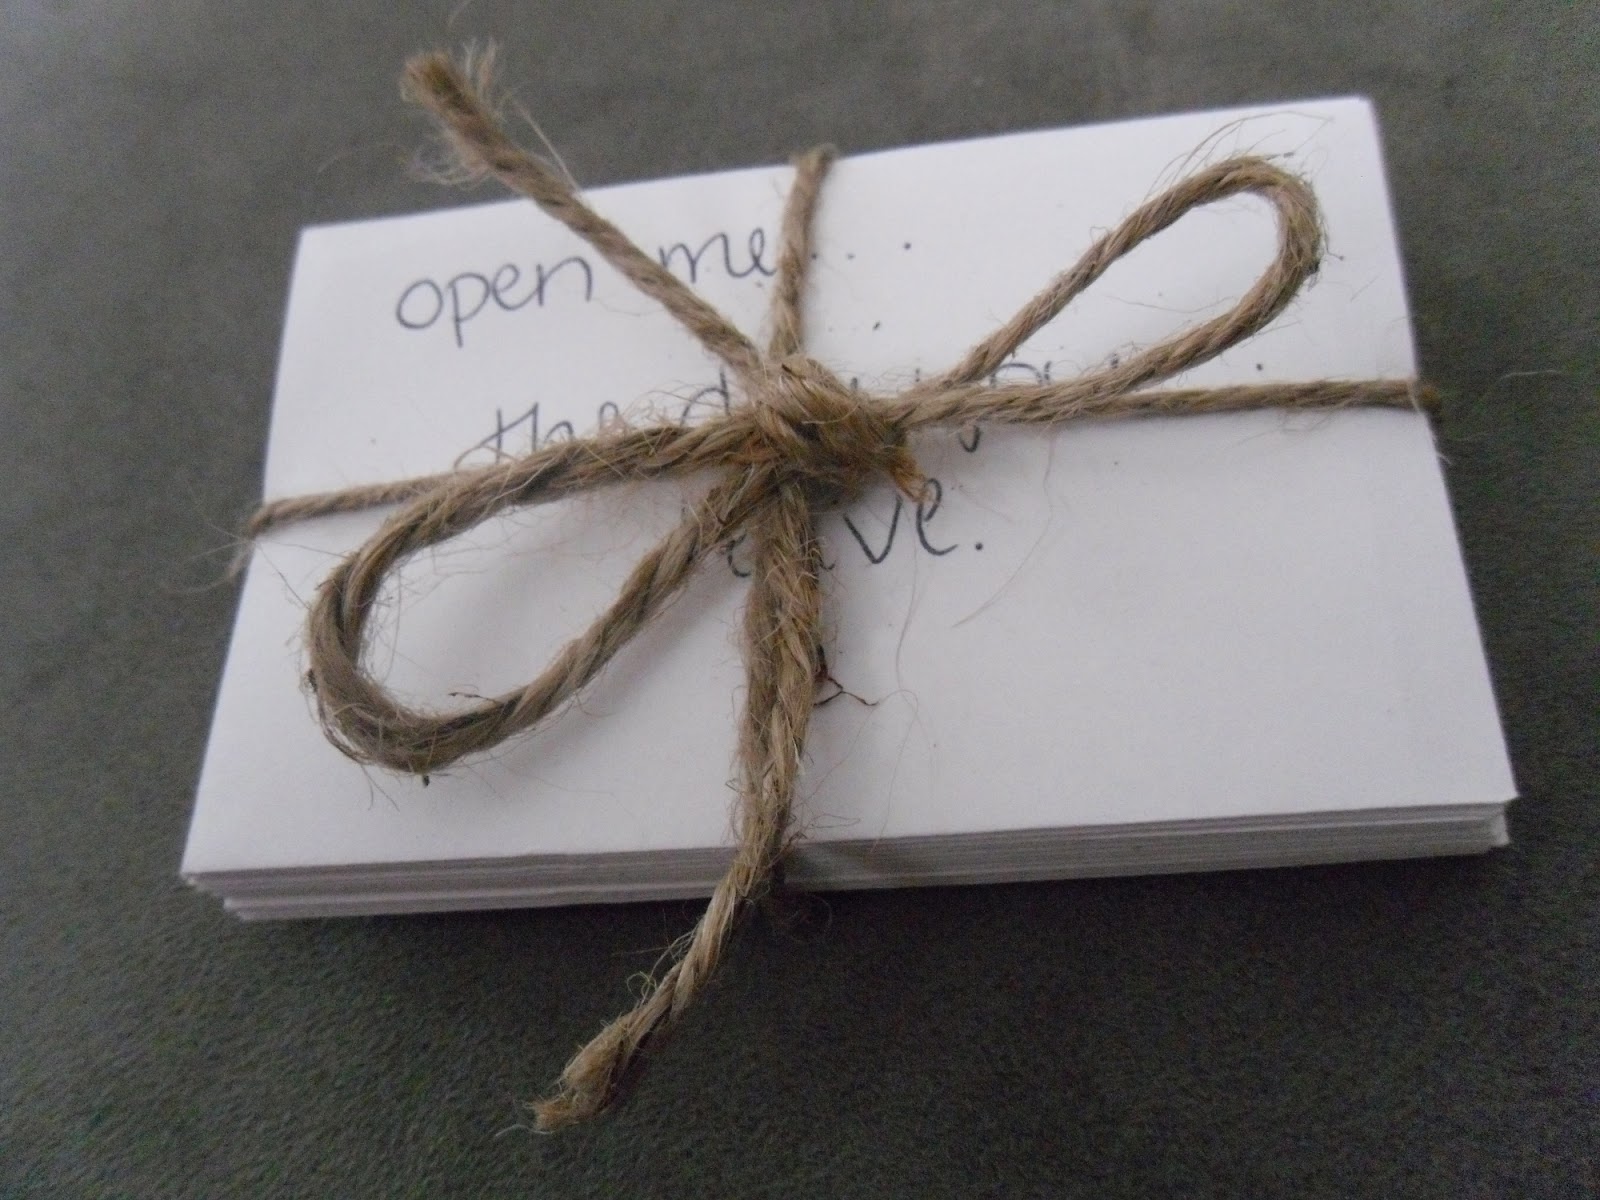
Since I already did a craft for the kiddos, I thought I'd also do something sweet for Chris. I did some browsing around on Pinterest and found a cute little thing where she wrote letters for specific times and sent them with her husband. I used that as a sort of tutorial to do mine. 

Here's what you need:
blank cards (or cardstock to make them)
envelopes
writing utensil
decorative embellishments
twine (or yard)

You probably have everything listed just laying around your house. I went to A.C. Moore and found tiny cards that had tiny envelopes to go with them. Saved myself some time there. Instead of decorative embellishments, I used my mad drawing and coloring skills to decorate my cards. I then carefully (read: very quickly) jotted down a bunch of reasons why he might need a little pick-me-up. On the front of the envelopes I wrote "Open Me When..." and then the reason beneath. I'll list some examples below once I finish explaining the craft. Then it was on to the cards. On the front of the card, I did some doodling to go along with what "Open Me When" was on front. Inside the card, I wrote whatever I wanted to. Then I sealed the tiny card in it's matching tiny envelope. After 45 minutes or so, I had a tiny stack of tiny cards ready to be tied up. I wrapped twine around the cards and hid them in my dresser. I plan to give him the card stack as he is leaving, briefly explain what it is and let it be. I mean, if you read "Open Me When..", it's kind of self-explanatory, right? Then again, he is a man. So a brief explanation will work along with it. Lol. Swear I'm not sexist. My husband and I just have a good sense of humor. 

My hope is that he can open these cards when he needs them and they brighten his day a little. He can use these in between getting mail and care packages from everyone. Here is a small list from the top of my head of reasons I wrote on the cards. I'm too lazy to go grab the cards and write them all on here, as that would require unwinding the twine and all that.

See how cute it is?!


"Open Me When"
-when you leave: Inside I wrote a little note about how we would be with him every step of the way.
-when you really want a home cooked meal: Inside I wrote about the day we refer to as 'the meatloaf incident' and how MRE's and chow can't be worse than that.
-if you get sick: Inside I put a band-aid (clever, I know) and said 'feel better'.
-when you really miss the kids: Inside I had our 2 year old draw things for him.
-when you can't sleep: Inside I wrote how I sometimes steal all of the blankets and the positive is he doesn't have to fight me for them.
-when you miss me: Inside I wrote a bunch of reasons why I love him.
-when you are on the way home: Inside I wrote how we made it and we can't wait to see him.

Those are just a few examples. I can't wait to give them to him. I know it's the little things like this (no pun intended) that will make his days easier. 


Monday, July 16, 2012

deployment project number one - visual countdown

Hello! We are starting to gear up for the big "D" and that means - lots of paperwork and crafting! If it were just Chris and I, this would be a breeze. However, we have a toddler to factor in, and soon, a newborn. I want to be sure to make this process as easy as possible on Conner. Lucas will be too small to remember any of it. I've talked to a few people who have been through it already and read a bunch of ideas on how to make deployment "fun", aka less depressing, on Conner. Despite the popular "Momma's boy" theory, he is ALL about his daddy. Maybe that has a little something to do with the fact that daddy has had to be away for good chunks of time throughout his almost 3 years of life. Either way, I'm going to make this deployment fly by for him as best I can by keeping him busy and sticking to our routine.

First thing I knew I wanted to accomplish was a countdown. I thought about just making myself a chalkboard countdown that said "Daddy Comes Home In XX Days", but come on. Conner is almost 3. He can count to 15 and that is that. Anything above that would mean a whole lot of nothing to him. He needs a visual way of seeing how far we've come and how much longer there is to go. I found the perfect DIY project for our visual countdown. It was simple, fairly inexpensive, and it's hands-on for the kiddo!


Aren't they cute? I got everything I needed for it from Wal*Mart. Two little vases, a small thing of ribbon, letter stickers, and some flat marbles. Everything was in the crafting section. I ended up getting two bags of the decorative marbles because I wanted to do the red, white and blue. One was a bag of different blues and one was a bag of red, pink and clear. I already threw the bags away or I would be able to tell you the exact names. You can change this project up so much to fit your family, though. Maybe your kiddos favorite color is green. They have those! Anyway, the most time consuming part of it all was to count out approximately 9 months worth if marbles. That's about 270, for those of you who are wondering. 

So now that we have our little jars completed, we just wait for the 'see you later' to come. Every night before bed, Conner gets to take one marble from the 'Days to Go' jar and add it to the 'Days Completed' jar. He'll be able to watch the jar fill up while the other one empties and know that he is that much closer to daddy being home again! I have these set up on my little bookshelf in the living room right now. We'll be getting a picture of Chris and putting it in between these two jars so he can say goodnight to daddy every night as well. I can't wait to share all of our other projects with you! Stay tuned. 

To give credit where it is due, I originally saw another version of this countdown for weight loss over here and then changed it for deployment. :)

Monday, July 9, 2012

pallet flag

Oh my gosh, I am SO excited that we have finally completed this project. I saw a picture of a (much nicer looking) pallet flag and wanted to recreate it, making it look more 'rustic'. I should have taken step by step pictures, but I'll explain the best I can.

First, we had to get wooden pallets. We accomplished this by finding some at WalMart. We used 2 of them. Chris removed all of the boards, splintering them along the way. He then pieced them back together, kind of like a puzzle, and nailed them into the base. 

Next, get some red, white and blue spray paint. Make sure it's weather proof if you plan to put this outside. We used duct tape to tape off the section that would be blue. Sprayed that and let it dry. Next, mark where your red/white stripes will be. We did not have room for all 13stripes, however, I made sure we began and ended with red like it should. Alternate the red and white stripes and let dry. I had a nifty star stencil leftover from a previous project, so he used that for the stars. Spray those white. Once it's all dry, you have a nice (or old, weathered looking) American flag!


For the time being, it's just propped up outside a window in the front of our house. I plan to do something else to make it a better decoration, but that's for another time. I have to draw up my plans for that and get the approval from the boss man. :) Overall, it took us less than $6 to make this. We just needed to buy paint. The pallets were free and we already had the stencil, duct tape and nails. Hope you like it as much as I do!


Saturday, April 7, 2012

Easter crafts with the kiddo

Chris has CQ today, so for the next 24 hours, it's just me and Conner. He's been asking to color a lot, so up first, printable Disney Easter pages that I found over here at Disney Clips. Free to print off the pages. He loves Mickey Mouse and Pooh, so it worked out perfectly. Here is a picture of his masterpieces. 


Next up, making a family of bunnies out of toilet paper tubes! Paper towel tubes will work just as well. I cut the tubes to make a taller 'Daddy Bunny', a little bit shorter 'Mommy Bunny' and of course, the little 'Conner Bunny'. He had so much fun making a mess. We painted the tubes and let them dry. Since I knew he'd make a mess and I have no painting smocks, I made a makeshift one out of a garbage bag. Cut three holes, two for arms and one for his head and voila! After they were dry, I used a sharpie to make their eyes, nose and whiskers. I'm all out of mini pom poms, but if I had some, they'd have tails, too. For now, a drawn on tail will work. I cut out some ears from paper and glued them on. Here's our little bunny family.


Last up, cookies! I will make some sugar cookies later tonight in the shapes of bunnies and eggs. Conner will get to decorate them with some icing. This also will get a little messy, so back to a makeshift paint garbage bag apron. Overall, I think we had a pretty successful craft day. Full of fun. If I remember, I'll snap some pictures of the cookie decorating and add them here.